Tuesday, July 2, 2013

Have Projects, Will Travel

Hello!

 As I mentioned in my last post, I am on the road traveling with my husband while he trains for his new job in the civilian world.   Did I mention that we are driving with three Yorkies in the car?   Well, we are and I can tell you that it's a lot of time in the car when you have three Yorkies insisting on potty breaks every few hours!  

Of course, as all avid quilters do, I brought along a project to work on while my husband drives.  In part, this is so that I make some headway on some of the many "hand-work" projects that I brought along with me.  But another reason is that I find I am much better off in thoughtful prayer with my eyes down and my needle moving while my husband re-lives his air-refueling days as a pilot in the US Air Force.  I tell you, sometimes he rides so close to the cars around him I can read the labels on the other driver's t-shirt.
Scary!

Anyway, I brought a couple of projects in the car and am happy to report progress...

My Antique Rose Quilt is from a McCalls Quilt pattern that I started ages ago and have yet to complete.  I mentioned this quilt in a previous post and it's on my Piecing List so I'm glad I am making progress on it.  This is where it was when I started working on it again:


And here it is now... Color difference is from using a new camera to take the pictures


Can you tell that now all the red flowers and yellow centers and one of the blue "bear paws" are done?  I use a template-free applique technique so it makes it hard to tell what is basted-on versus sewn-on.  Not as much done as I would like but it's a start...

Now, my mom started this same quilt about 6 months after I did and hers is done!  I have it loaded on Gammill Bea (my longarm) and am almost done quilting it.  This is an early-on shot taken just as I started the quilting.


Once we arrived in Phoenix, AZ. we settled into Dave's folks house. We are very fortunate that it's only a short distance to the training site and that his parents, who have fled from the nuclear hot Phoenix summer, were so kind as to allow us to stay in their home...with three Yorkies...while they are away.
God Bless you, Dave and Carnell!

  If you look back at my previous posts, you'll see that I have spent some time at the Arizona quilt shops.  From Tuscon to Prescott and most places in between there are some really great shops here but on this trip I didn't go to any of them!  Now, for me, that's a hard thing... I hate knowing I'm passing by a quilt shop and can't go in.  But I had my reasons... First off, we were down to one car so I only had a couple of days when I could shop. The main reason though, is that I have soooo many projects already and I really, really, REALLY want to get some of them done!  So, I decided to stay home and get a few of my projects off the list.
 
I brought about 15 projects along with me all in various stages of completion.  I decided to just dive in and I am happy to report that I got two projects D-O-N-E!
 
The first project is this cute tote bag from the book
Everyday Living, Make It & Sell It. 
 
 
This pattern uses French Seams which is not only a very
cool technique but makes a wonderful neat seam.
 
This is the seam.  I know it's a little hard to see but that's what makes it great :)


The next project is a new spin on an older technique...
Remember the watercolor quilts that used the grid-interfacing? 
 
 Well, Quiltsmart has put together the Mondo Bag using a
grid-interfacing and - to make things really easy -
you can use mini-charms!
 
As you can see I used "Ticklish" to make my Mondo Bag.


I thought I'd share a few things I learned while putting this bag
together so that if you decide to give it a whirl you'll avoid
some of the pitalls I encountered.
 
I purchased 5 mini-charms as I was told that's what was needed to make the bag, which is true if you don't consider the handle part of the bag.  So, buy six if you want to make the handle out of the charms as well.  I ended up using my lining fabric for the handles and was happy with the results so that is always an option.
 
There are four grid-interfacing panels that make up the bag.  When using the mini-charms, layout all four panels at one time.  I did mine individually and found that I had used my favorite fabrics from each mini-charm pack all up before I got through the third panel. You will use all but maybe 2 or 3 of the squares from the five packages so you may want to buy a few extra mini-charms if there are fabrics included that you don't want to use in your bag.
 
Here is a layout in progress
  
 
Once your've completed your layout you iron everything in place and then using a 1/4 inch seam allowance start sewing just like you did for those watercolor quilts. 
 
Here is the panel after it has been ironed and sewn- 
 
The back-
 
 
And the front- 


 Perfect Corners!  Which is one of the reasons I love
this grid-interfacing techinque! 
 
This is my helper, Katie Belle. 
She is a 3 month old Yorkie and makes it her business to insure that everything I make can be used at naptime.  Riley and Murphy, my other two yorkies are smart enough to stay out of my way when I'm quilting.


Here is my finished bag.  The interfacing gives the bag body so that it doesn't fold in on itself.  In this picture it kinda looks like the bag is hanging on the wrought-iron shelf but it's not!
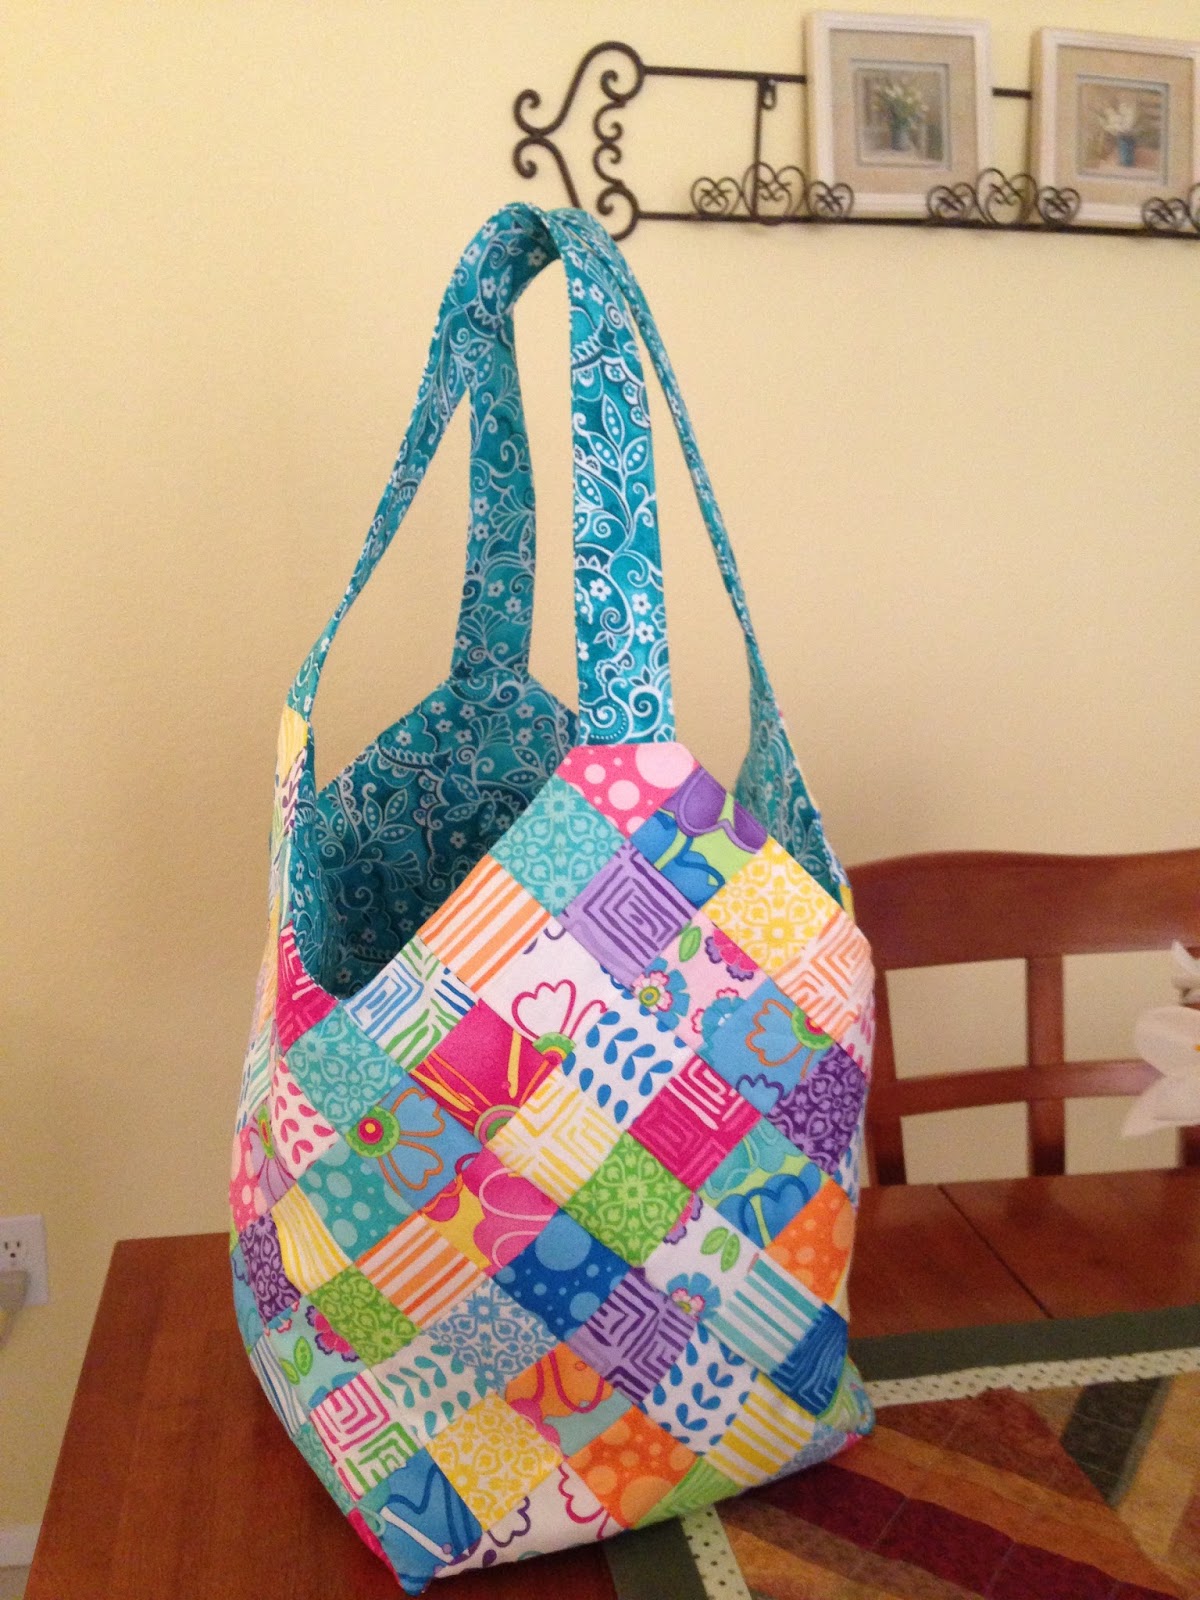


Again, this bag is MONDO!  Great for almost anything, I used it at the grocery store and was able to fit about 15 things in here!  See how well it stands open?
 
 
Fabulous, right?  This would be great for any day trip or an overnight trip. 
You can get so much in this bag it's crazy! 
 
 
 I also mangaged to get some of my Farmer's Wife quilt blocks done too. 
Have you seen this book?
 

This quilt is based on submissions to a publication called, you guessed it, The Farmer's Wife.  There are 111 blocks in this book... each 6" finished.  I belong to a block of the month club and each month they send 8 or so blocks to complete.  They are on month 4...I am on month 1 and playing catch up. 
Thanks to the miracle that is the internet, I belong to a Yahoo! Group called...you guessed it!...The Farmer's Wife and they have provided paper-piecing patterns for all the blocks!  Hooray!
 
Now, it's my experience that most quilters either love or hate paper-piecing.  I happen to be one of those who love it for the same reason I love the grid-interfacing technique...the precision is wonderful! Here are the blocks I have finished so far...


3 down, 108 to go.
 
One of things I decided to do is put the date I complete each block on the corner of the page and swatches of the fabric used for each block.  You can't see the date in this photo but there are the color swatches.  I'm not sure why the picture is sideways....oh well, you get the idea.


My mom is also doing this quilt and just like with the Antique Rose, she is way ahead of me and getting her blocks done each month as she receives them.  I wanna be just like her when I grow up!
 
Well, I'm afraid I've been a bit long-winded (or written) again.  That's good news because it means I got a lot done that I could share with you! 
 
Keep Quilting!
 
Irene

Saturday, June 29, 2013

Back on the Blog!

Yep, FINALLY!  I'm back on the blog!  It's been over a year but here I am.  You're probably wondering where I went...or maybe not but I'll tell you anyway :-P
 
There I was, minding my own business when all of a sudden I was overtaken with this crazy idea to get a JOB!  Yes, a JOB!  I don't know what I was thinking...well actually, I was thinking, "Imagine all the fun quilty stuff I can buy if I have a job!" So, I started the hunt and THAT was the beginning of the end.
 
I was hired in February 2012 by a local contract manufacturer as an Account Coordinator.  It was a good job in that the days went by VERY fast.  It was like being in a time warp.  I no sooner arrived in the morning and BAM!  It was time to go home.  That was the good part...well, that and payday.  The bad part was that by the time I got home at the end of the day I was EXHAUSTED and having spent the entire day on a computer the LAST thing I wanted to do when I got home was more computer stuff.  I didn't even want to SHOP online! 
 
On top of that, I had no quilting time.  I worked a 45+ hour work week and used the weekend to do laundry, housecleaning, pay bills and that kind of icky household stuff so even if I had time I wouldn't have much to blog about....I mean, who cares about how a dropped I brand-new, giant-size bottle of laundry detergent which broke open creating a mess that took HOURS to clean up?  And while now I had some extra cash, I had no time to spend it!  How awful is THAT?
 
Well, my salvation came in the form of my husband's retirement from the US Air Force after 26 years of service and his entrance into the civillian workforce.  His new position requires him to go to several different places for training over the course of several months and we decided that I should travel with him rather than be apart for 9 months which of course meant that I had to quit my job.  The funny part is that shortly after I quit my job my husband's new employer changed his training to just two months! God works in mysterious ways!  My last day of work was in March and since then I have been crazy busy putting together my husbands retirement dinner/party, entertaining visiting family and friends, and getting ready for our travels.  Now we are on the road which means I'll be able to go to a ton of new quilt shops and blog about them all. I'm so EXCITED! 
 
To be completely truthful, I can't say I haven't quilted at all...I have managed to work on a few things and when I get back home I'll show you what I've gotten done.  I'll have to update all my lists, too. Sadly, my New Projects and Piecing lists have grown at a much faster rate than my Finished list but I just get so excited when I buy and start new projects.  Of course, I've brought several projects to work on while "on the road" and so I'll be able to share those experiences with you.
 
I had some very specific criteria when choosing the projects to bring along with me.  First of all, it had to be something that I could work on using my 1952 Singer Featherweight. 
 
 
Now, if you ever get a chance to buy one of these babies in good working condition, DO IT!  It is the greatest machine and so easy to travel with and great for taking to classes. 
 
Secondly, it had to be a project that was already started AND either hand-work, or a paper-pieced project. Why paper-pieced?  Basically, I don't like to switch machines in the middle of my projects because they all sew a little differently.  With paper-piecing it doesn't matter because you are sewing 'on the lines'. 
 
Now I did have one exception to rule two, and that is my Wedding Star quilt.  This is a pattern by Judy Niemeyer and uses Bali Pops.  I took this photo of the sample hanging in the quilt shop where I bought the pattern. 
 
 
Here's a detail shot...
 
 
Isn't it wonderful?!
 
I haven't started it yet and am a little intimidated because this is a big quilt. 
But it is, for the most part, paper-pieced!
 
Well, this has gotten a bit long-winded but it has been awhile since we last visited. 
Check back in a couple of days and I'll show you all the projects that I brought along
 and the progress I've made on each of them :-)
 
Until then,
Keep Quilting!
 
Irene


Tuesday, March 20, 2012

Accuquilt and Done!

Hello Quilters!


You haven't given up on me and my blog and I am so thankful!  I'm always torn on how to spend my time...quilting or blogging about my quilting.  I love doing both and so its hard for me to choose!  Of course, I always get to a point where there is something I've done that I HAVE to share so that sends me from the sewing machine to the computer!


So since the last time we visited I have managed to get a few things rolling...

I worked on my Old Maid BOM and here are the finished blocks for month 1


Aren't they wonderful.  I love the colors.  Some of them I didn't like at first, but cut up and put back together with the other ones that I love and they look great!

Now, one of my toys that I haven't blogged about is my Accuquilt Studio.


I got this as a Christmas present from my wonderful husband and kids.  I've been practicing and have decided that it's time to use it for my next quilt.  I figure my new Block of the Month Civil War Journals would be the perfect quilt to use for my Accuquilt Studio's maiden run!  The first step was figuring out what die cuts to use.  I got the "Bread and Butter" die cut set with the Studio but I needed a couple of different ones...namely the 2" square and the 3" finished Half Square Triangles (HST). 


This is the top and bottom of the die for the 2 " squares.

Now, one of the tricks of the trade is that if you think ahead and layer your fabric right sides together when you cut out the shapes they will be all set to sew together. 


This is the fabrics I need for the HST layered on the HST die.

And through the Studio it goes.  Sorry for dark pic but
there was too much glare with the flash.


Once it rolls through the machine (You hand crank it through)
 this is what you end up with:


HSTs with the ears already trimmed!  Yea!


Here they are all stacked and ready to be sewn. 


I chained these babies together!


 Ignore my icky ironing board. 
It's time for a new cover and just haven't bothered to deal with it!


Now, one of my biggest concerns about using the Studio was that there would be a lot of waste but as you can see it's not that bad- it just takes a little practice. 


And the time I saved!  Friend, I cut out 160 2" squares and 32 HSTs AND
chain-pieced the HSTs together in UNDER AN HOUR! 
And they were perfectly cut!  It was so easy and wonderful!


Here's all the pieces.


And here they are complete!


Civil War Journal Month 1
All 8 DONE!

FABULOUS!


Well, this was a great a visit. I hope you enjoyed it as much as I did!

Keep on QUILTING!

Irene

Wednesday, February 29, 2012

Oops, I did it AGAIN!..and AGAIN!

OK, well. What can I say?  I couldn't help myself! I saw it and I HAD to have it.  It was so pretty and the fabrics were beautiful and, and, and.... so, I did.  I started another Block of the Month.  This one is called OLD MAID and I saw it while I was at Bella Quiltworks in Tuscon Az.  It's the quilt hanging on the wall. 


Now the idea of this quilt is that each block appears twice except for one which is, of course, the OLD MAID!  To make it a little more difficult to find the OLD MAID, although there are two of each block, the pair are not made with the same fabric.  

Here are the fabrics for my first set of blocks.  Each month they send enough fabric to make 6 blocks and each block is 8" finished.


I got all the pieces cut out and ready for sewing...


No OLD MAID in this set!

Now, you may have guessed from the title of this blog that this is not my only new BOM, and you would be right...  I couldn't help it!

This is another Civil War Quilt called Civil War Journal.  Here's a picture of that one:


Isn't it FANTASTIC!  I just could not resist!  I haven't started this one yet.  I will in the next couple of days though!

Now, just to reassure everyone, I have not given up on working on my lists.  I have ordered some stuff for Gammil Bea and so that's in the works and I am anxious to get some quilting done.  But I have also finished Month 2 of my 1st Civil War Quilt- Civil War Tribute.  These are the fabrics used for Month 2


 And here is the finshed blocks..there are four of these in the quilt.


 So here is what I've finished so far:


 Not the greatest picture but you get the idea!

By the way, I had a brain storm!  I hate ironing.  In fact, my hubby asked me once to iron a shirt for him and I replied, "only if I can cut it up and sew it into a quilt block!"  (The key word there is "ONCE" :P )   Anyway, so I was ironing the fabric for my Civil War Tribute Quilt and I thought maybe I can iron a few (since I have them all).  The problem is keeping them ironed until I get to them.  Well, I got a skirt hanger and hung the fabric with the pattern.


It's great!  I've got 5 of them ironed and hung and waiting for my rotary cutter and sewing machine.

Well my friends, that's about all this time. We'll visit again soon!

Happy Quilting!

Irene

Sunday, February 12, 2012

Longarmed and Dangerous

Oh my goodness!  I can't believe how long its been since we last visited!  It's been a crazy three weeks for me  but I have managed to get a few things done...


Did you know that I am Longarmed and Dangerous?  

Well. Meet my Gammill Bea. (Named after my Grandma Bea)


My Gammill Bea has traveled with me for the past 7 or 8 years. She has been a constant friend standing always at the ready. It's taken me a long time to get Gammill Bea's room all set up but I finally took an afternoon to get it together.  It's not totally finished but at least everything is just about in it's place.


So, now that Gammill Bea is all settled in I hope to put her to work really soon!

Do you remember my private little Phoenix Shop Hop? Well, on that shop hop I found a product that I thought I would give a whirl and let me tell you...I LOVE it!!

It's called Hugo's Amazing Tape.


I must confess, it was a little pricey...if I'm not mistaken about $15 but I think it was worth every penny!


This is how my cones of thread looked before Amazing Tape...


And this is after...


It's wonderful.  It isn't sticky...more like cellophane or plastic and you can use it on just about anything...including paper which is wonderful because I have a lot of Pantograph patterns that I use with Gammill Bea and this stuff keeps them from unrolling!  Fabulous!! It's reusable too so if I use a cone of thread, once I'm done I can use the same piece to close it up again.  Love, Love, Love IT!

As far my project lists are concerned, well, I haven't got as much done as I would have liked but as I said it's been a little crazy recently.  In any case I did manage to find the time to work on a few projects. 

I finished the Door-A-Doodle Snowman and Heart...two of each! I have only to finish the hand-stitching portion of the binding and they will be all set to go!  But, I have a little confession to make...
Along with the Amazing Tape that I bought, I bought a new project.  I know, I know.  I'm supposed to be finishing projects I already have but I couldn't resist!  I don't know about you but we eat a lot of flour tortillas in my house and I found a pattern to make a microwave tortilla warmer! 


The pattern called for a 13" circle. Now, whenever a pattern calls for a circle...I head for the kitchen.  There are a thousand circles in the kitchen of various sizes and I've yet to be disappointed!  I used a platter that I have never used for serving but it made a great template :)  So, now I needed something that I could use to make the template out of.  Normally, I would use cardboard but I didn't have a big enough piece.  My plastic template sheets weren't big enough either...What to do?!?!

Then I remembered that I had an old cutting mat that had been warped and out of shape.  This became my template material and it worked great!


 The pattern was easy to follow and went together really quickly and voila!  I now have a tortilla warmer.  This project didn't get put on my "New Project" list but since I finished it I don't really need to!  Whoop! Here's a pic of the finished project and the stuff I used to put it together.


I also worked on my Antique Rose Hand-Applique Quilt project but I didn't get as much done as I'd have liked...oh well.  I'll get to it, right?

Well, dear friends. I better get the house clean and the bills paid...
which is what I was supposed to do when I turned on the computer.  I'm so glad we got to have this little visit and I hope to hear form you all in the form of your comments.

Happy Quilting!

Irene